Archive
Static RPKI in Nokia SROS15
Here is a quick look at static RPKI on the Nokia 7×50.
Resource Public Key Infrastructure is a security measure which attempts to solve, or minimise, the impact of prefixes being disseminated from invalid source ASNs. This is where an AS will hijack and originate a prefix when it does not own it. Sure this can be because of a legitimate mistake but it can also be used for being naughty.
You can use dynamic or static mappings to confirm the legitimacy of the prefix origination. Here I will use static only.
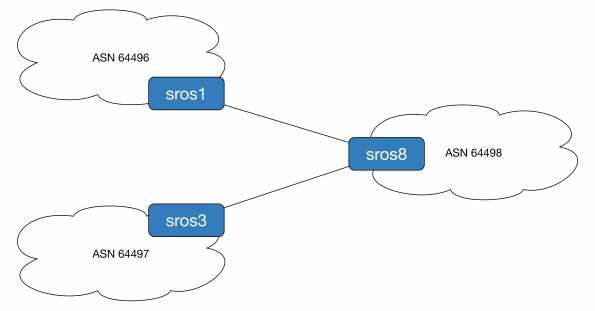
To demonstrate this we will originate prefix 192.0.2.1/32 from ASN 64497 (legitimate owner) and ASN 64496 (naughty people). ASN 64498 will use static mappings to decide which is the source of truth. For reference sros1 is running release 14, sros3 is release 13 and sros8 is the all new release 15 router.
First we configure the loopback addresses and BGP sessions.
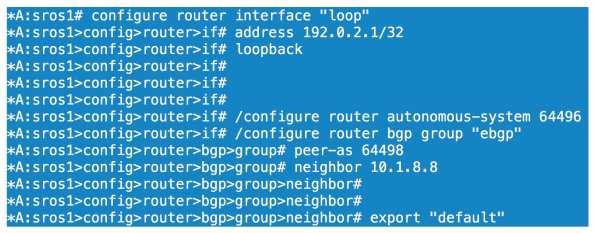
All we have done here is configure a loopback on sros1 of 192.0.2.1/32, set our ASN to 64496 and configured our BGP parameters for our session to sros8. We configure the equivalent BGP config on sros8

We then confirm sros8 is receiving and installing 192.0.2.1/32 as the best path.

Before we look at competing ASNs let’s enable prefix validation on sros8.

We can configure our dynamic relationship with a server under the rpki-session config context or we can configure statically. As I don’t have the option of using RPKI server mappings right now I choose static. Here we configure an entry that covers anything within 192.0.2.0/24 up to a prefix length of /32. This covers off the 192.0.2.1/32 prefix I am receiving from sros1. We then specify the ASN of the source and either tag it as valid or invalid. Here we are going invalid as we know AS64496 should not be originating this particular prefix.
If we look at our local database on sros8 we can see a flag of Static-I set. This means it is statically configured as invalid.

Now will BGP reject the prefix? 
No because we haven’t told the BGP process to do anything with the origin validation information yet. We need to enable origin validation within the BGP group context.

So now we have enabled origin validation with the BGP group config we still have one step to carry out. As shown above we need to tell the BGP process that anything marked as origin-invalid should be considered unusable. Once we make that change the path will no longer be considered in the best path selection process.
Now what if AS64497 starts legitimately advertising 192.0.2.1/32, will we allow this? One would hope so!

We now have our peering up to both sros1 and sros3, both of which are sending us 192.0.2.1/32.

On the prefix received from sros3 we have an origin validation state of NotFound, basically not explicitly valid or invalid. sros1 reports the state as invalid and, as we saw, it cannot be considered for best path determination.

Loophole the BOF
If you have a lab and you want to connect to your SROS routers mgmt interface from wherever, you may know you cannot configure a 0/0 static route. Want to get around it? Configure something like the below.
#### Don’t do this in production! Don’t do it if your lab is not secured ####
*A:r5>bof# static-route 0.0.0.0/0 next-hop 192.0.2.254
MINOR: SYSTEM #1505 Invalid static route destination prefix – cannot configure default route on the management interface
*A:r5>bof# static-route 0.0.0.0/1 next-hop 192.0.2.254
*A:r5>bof# static-route 128.0.0.0/1 next-hop 192.0.2.254
The perils of CPM filters and how to use them – 7750 SROS
Control plane filtering on the 7750 is managed with CPM filters, any time you want to secure you device or protocols you need to use these guys. They are basically access control to the processors and used wisely they are incredibly powerful. Use them foolishly and they may cost you your job. Configure them incorrectly and you can isolate your node or bring down your entire network! There is an urban legend that someone made a change to CPM filters from SAM and pushed them out to all nodes and unfortunately all remote access was lost, mega truck roll time!
****************** Caveat and warning time ******************
I am writing this post from memory, with some output I was able to find. I don’t have
any lab equipment to test this on so nothing below can be considered tested and/or safe
to deploy. You can do some serious damage with control plane filters. Do not deploy
without doing your own testing and/or vendor support. I’m not taking responsibility for
your actions. I can’t over emphasize testing every single change no matter how small.
**********************************************************************
OK so now the formalities are done with what can CPM filters do? I guess the first thing is they are not supported on the SR1 (or the 7210, they have other methods) so you need a bigger router. Like I said above they allow us to permit or deny addresses and protocols access to the CPM. You can configure MAC, IPv4, IPv6 filters but we will focus on IPv4 for today.
The first, and probably most crucial, is the default action applied to the filters. If you have no filters configured and you set the default action to deny then get in your car and head to site. Let’s set the default to accept which you should always do when you are making the filter list for the first time.
configure system security cpm-filter default-action accept
For reference the keyword to set the deny all else is ‘drop’ instead of ‘accept’
Now we have allowed all access to the routers control plane. Anything else we specify will either be allowed or dropped. Anything we don’t match at this point will be allowed as well, highly insecure. It’s up to you to determine your security policy and ensure it is based on best practice.
For the remainder of this post we will look at OSPF ensuring it is secure (we still need authentication of course). We will create filters for OSPF but also create a log mechanism to ensure any denied traffic is signalled to the operations guys. We will permit what we want, explicitly denying what we don’t and ignore the default action until the end.
Let’s configure the prefixes we want to match against and allow, assuming the neighbours are on 10.10.10.0/24
configure system security cpm-filter ip-filter
entry 10 create
description "allow ospf"
action accept
match protocol ospf-igp
src-ip 10.10.10.0/24
exit
exit
Lets deny all other OSPF
entry 20 create
description "drop all other ospf"
action drop
log 123
match protocol ospf-igp
exit
exit
If any OSPF traffic not sourced from 10.10.10.0/24 hits the CPM it will be dropped and because we have the default action set to accept all traffic will be successful beyond this.
In order to verify if packets are being processed or not issue this command and you will see something similar to the following:
show system security cpm-filter ip-filter
===============================================================================
CPM IP Filter (applied)
===============================================================================
Id   Dropped              Forwarded            Description
-------------------------------------------------------------------------------
10  0                    648                   "allow ospf"
20  11                    0                    "drop all other ospf"
What this tells us is 648 packets have been accepted sourced from 10.10.10.0/24. These will allow us to form adjacencies. The makey-uppy 11 dropped packets are assumed to be from any other address that we don't trust. You can see more detailed output on a per entry basis by specifying entry $number$ in the show command.
Now you will notice the log 123 statement in the deny entry. This will allow us to have a record of denied OSPF packets by sending entries to syslog.
First lets configure a syslog specific log
configure log
syslog 2
description "send naughty ospf to syslog server"
address 172.16.1.1
exit all
Here we are saying log 2 is used for syslog and the IP of the syslog server is 172.16.1.1. We now need to reference the syslog credentials in the filter log.
configure filter
log 123 create
description "log for untrusted ospf"
destination syslog 2
wrap-around
no shutdown
What we have done now is send logs for entry 20, based on its mapping to log 123, to the server listed in syslog 2. It's extra work to do all this but it's this type of modularity that I like about SROS.
So what have we achieved? We can now form adjacencies with our neighbours without being open to any attack from other routers outside of our controlled prefix. Of course we must secure our entire control plane as best we can. You should look to permit your IGP, LDP, RSVP, BGP, VRRP if you use it, multichassis protocols such as MC-LAG, BFD along with management protocols such as TACACS, SSH, NTP etc. This list is by no means exhaustive, you need to analyze your network traffic to see what you have hitting your CPMs. Once you have identified all relevant traffic, test your filters then set your default action to drop using
configure system security cpm-filter default-action drop
CPM filters are a must but they need to be respected or they will create more work for you down the road.
